Streaming services like Netflix, Hulu, HBO Max, Disney Plus, and Apple TV Plus offer a collection of exciting content for your binge-watching weekend. You can stream reruns of classic series or watch new movies or shows.
But, not everyone can watch selected movies and shows due to geographical restrictions. Streaming services implement geo-blocking when your location does not allow certain contents for streaming.
Now, you can bypass geo-blocking on your Apple TV set-top box by changing your IP address. Restrictions are usually based on your IP address since it identifies your location. Changing it will enable you to stream unlimited content without any blocking.
DON’T MISS: Latest Deals on Different Apple TV Models at Amazon Right Now!

How to Set up VPN and Connect Apple TV Using a Different IP Address
The best way to change the IP address of your Apple TV is to use a VPN service. VPNs work by rerouting the data traffic to hide your IP address. It will make your location invisible to everyone so you can watch even geo-restricted content.
There are two ways to change the IP address of your Apple TV using a VPN. But first, you will need to have a reliable VPN service.
Here are some of the leading VPN service providers in the market today. Any of these companies provide industry-standard service that will exceed your requirements.
Install the VPN to your Router

When you install the VPN to your router, it will immediately mask the IP address on any device connecting to it. That means your Apple TV will not show your real IP address is connected to your router.
There are ways on how to install the VPN to your router. Installation instructions are available depending on your VPN provider and the model of your router.
Use the SmartDNS of your VPN

Many VPNs today have the Smart DNS function installed. Unlike VPNs that hides your IP address, SmartDNS will replace your DNS and not reveal your location. You can generate a new DNS that you can use for your Apple TV.
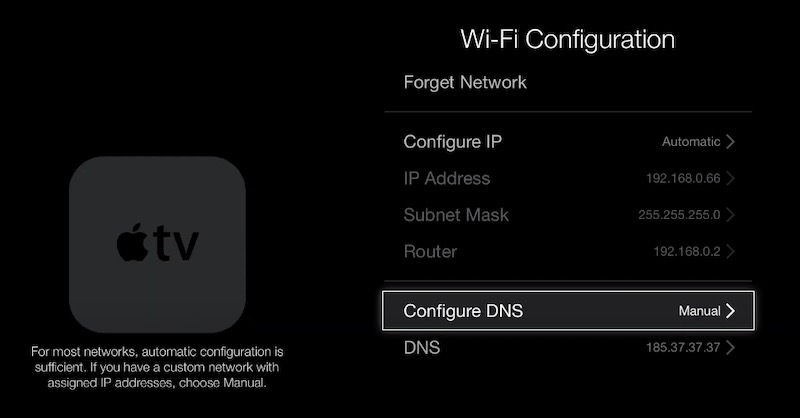
To configure the DNS on your Apple TV, go to the Settings menu. Select Network and go to the Advanced Settings. Look for Configure DNS and then change to Manual. Now, type the new DNS.
Were you able to stream location-restricted movies and TV shows on your Apple TV? Tell us your experience in the comments below.
CHECK OUT: Walmart Offers Exclusive Deals on the Latest Apple TV Devices!


