
Streaming Netflix on Windows 10 computer or tablet gives you more flexibility when it comes to watching your favorite movies or shows. You don’t have to limit your streaming on your smart TV or your mobile device. Now, you can take Netflix anywhere on a bigger screen when you watch on your laptop or tablet.
It is possible to download titles on Netflix and watch them offline, thanks to the Netflix desktop app for Windows 10. However, the downloaded movies or shows automatically go to the drive where you saved your Netflix app. It may not be a problem as long as you have enough space to store the contents. But, if you run out of space, you will need to move the offline download location of Netflix movies and TV series.
By default, the Netflix app and content on Windows 10 PC are both saved in the same drive. That means all saved files are in one location taking up all the free space. There may not be an easy way to change the Netflix default download location. Fortunately, some workarounds will enable you to move the Netflix downloads.
How to Change and Move the Offline Download Location of Netflix App in Windows 10
Netflix automatically saves downloaded contents to the C drive. There are two ways how you can move the file location to another drive. Check out the options below.
Using the Move Button
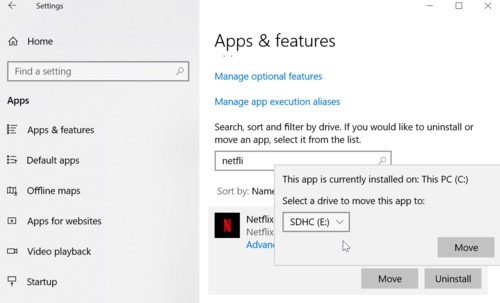
Launch the Settings menu of Windows 10. and go to Apps. Click Apps & features. Now, look for Netflix. Then, click the filename, and it will show two options. Click the Move button. Then, choose the drive where you want to move the downloaded files. And then, click the Move button again.
Uninstall and Reinstall Netflix
This method may need you to do more steps than method 1. But, you can follow this process if the Move button in the Netflix app is not functioning or is greyed out.
To start, open the Settings menu on Windows 10 and click Apps. Select Apps & features and choose Netflix. Now, click the Uninstall button. Go back to the Settings menu and select System. Go to Storage and click the Change where new content is saved. Look for the New apps will save to option. Click the drop-down menu and select a new drive where you want Netflix to save the downloaded titles.
After doing so, reinstall Netflix from the Microsoft Store. It will automatically save Netflix on the new drive.
Which of the two methods above worked for you? You can tell us in the comments below.